How to install Ubuntu on a Mac or Macbook
The official release date of Ubuntu 14.04 LTS Trusty Tahr is coming up in just over a week from the time of writing. With that, many of you are going to want to install the next version of the best Linux operating system on your computers, and if you want to install on metal along side OSX and have a Apple Mac or Macbook this is the guide for you!
You’re going to need a few things before we get started:
- Download Ubuntu 14.04 LTS Trusty Tahr. (If you’re here before it’s released you can download the daily image here. Be sure you download the iso which does NOT have ’+mac’ in the filename. This is for older Apple computers.
- Download the rEFInd Boot Manager. You want the Binary source file zip which you need to extract.
- A 2GB or bigger USB stick which has nothing on it that you don’t care to lose. This will be our boot stick…(remember when they were boot disks?)
- A thunderbolt to ethernet adapter or if your machine has an ethernet port, plug it in. After installing Ubuntu it is unlikely you will have wifi until the final step.
- Your computers hard drive should have a big chunk of free space…you’re going to use this as your primary operating system afterall!
- An hour or so of free time. This took me about 30 minutes from start to finish but I had done it a number of times by the time I created this post.
Obligatory Warning
All of this information is provided without warranty of any kind. Always make and keep proper backups of your data.
Step 1
BACKUP YOUR COMPUTER
While it’s unlikely that an issue will occur which wipes the data on your disk it’s always highly advisable to have a couple quality backups just in case.
Go make another backup…I’ll wait.
DID YOU BACK UP YOUR DATA YET?
Step 2
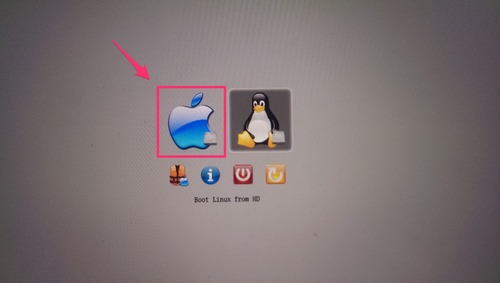
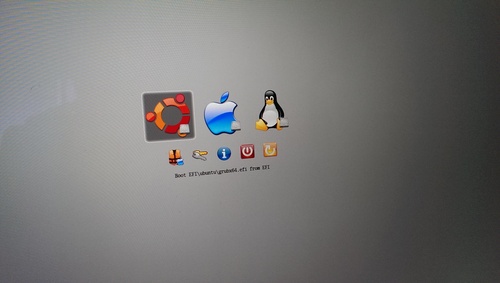
Now that you have a quality backup safely tucked away you will need to install rEFInd. Open the terminal and navigate to the location that you extracted the zip file and then follow the installation instructions for OSX. Once completed, restart your computer to confirm that rEFInd was installed correctly. On rebooting, the rEFInd boot loader should load up and you should select the Apple logo to get back into OSX. (sorry for the sub par photos)
Step 3
Now that you’re back in OSX we need to take that iso of Ubuntu 14.04 that you downloaded and make a bootable USB stick. Follow the 10 steps outlined here to create the bootable stick. You’ll know when it’s ready because OSX will pop open a dialogue saying that it cannot read the device.
Step 4
You need a place to put Ubuntu on your computer, so you’ll need to create a partition on your hard drive. The size of this partition will depend on the size of your disk and what you plan to do in Ubuntu, but it should be at least 10GB to give you some wiggle room (mine is 100GB). To do so you will use the OSX tool ‘Disk Utility’. There are some dated, but still accurate instructions on creating this partition here.
Step 5
With the partition made it’s now time to stick the USB stick into your computer and reboot. After rebooting you should land on the rEFInd boot loader again with a few more options than before. If you do not see these options then reboot again holding the “option” key.
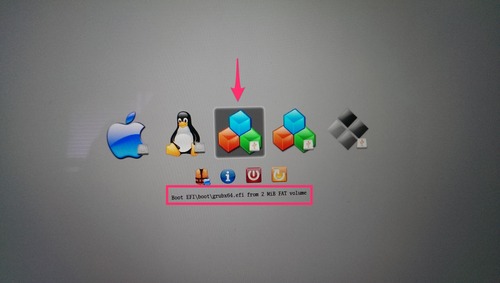
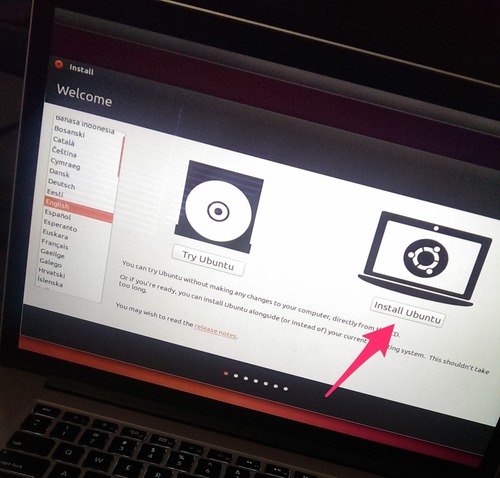
Your options may look a little different but you want to pick one of the options which are provided from the USB stick (There are three provided in this image). For the Haswell equipped machines you want to pick the option which reads something along the lines of “Boot EFI\boot\grubx64.efi …” and hit enter. This will start another boot loader with the first option “Install Ubuntu”, hit enter to select this option. After a little while you should be in the Ubuntu installer, follow through the steps until the installer asks you where you would like to install Ubuntu.
Note: If after progressing through the install process and you find that it boots into a black screen start again from Step 5 but choose an installer without “EFI” in the path name.
Step 6
Note: partitioning will be a little different for everyone so if you get confused hop onto IRC in #ubuntu on freenode.net or create a question on http://askubuntu.com for some help.
When you step through the installer you will get to a pane which asks you where you want to install Ubuntu to. The options should be pretty self explanatory. But if there isn’t an option to install Ubuntu into your new partition you will need to take the manual route. Select the manual partition option and you should be shown a screen which looks like:
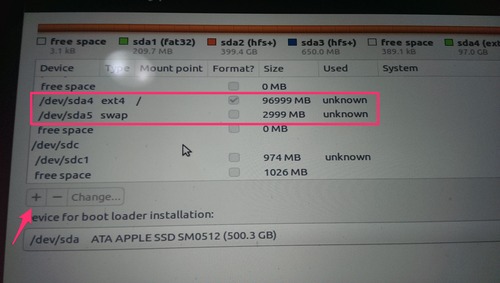
As you can see form this list, I created a 100GB partition originally and then created a 3GB swap partition. To take the partition you created in OSX and create a swap from it you will need to select it then hit the “Change” button and downsize it 3GB. This will leave you with “free space” of 3GB. Click the “+” button and create a new partition of the type “swap”. You’ll want to make sure your primary partition is of type “ext4” and that the mount point is “/”.
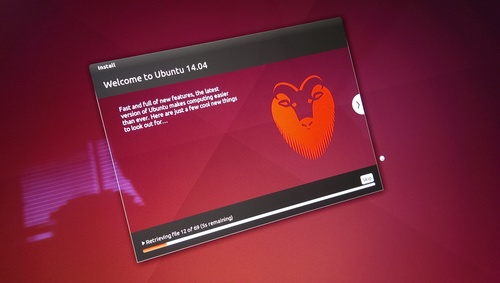
Continue on from here installing Ubuntu to your new partition.
Step 7
After the installation has completed remove the USB stick from your computer and reboot. Now when rEFInd shows up you should have an extra option with the Ubuntu logo. Click it and boot into Ubuntu.
Step 8
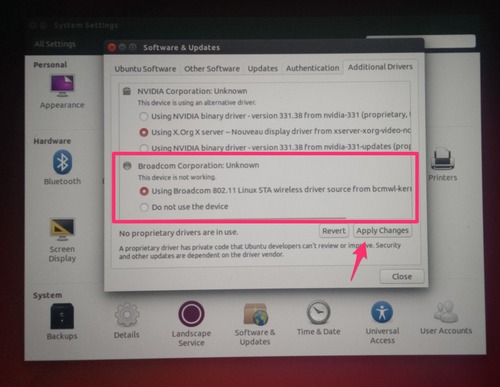
Once you have logged into Ubuntu, click the ‘System Settings’ icon in the launcher bar on the left. Select ‘Software and Updates’ and then select the ‘Additional Drivers’ tab. After this tab loads you should see a proprietary driver for the Broadcom wireless, select it and click ‘Apply’. Reboot the computer and you should now be able to click the network icon in the top right of the desktop to connect to a wireless connection.
Congratulations you now have Ubuntu installed along side OSX!
If you run into any problems along the way or have any questions your first stop should be your search engine of choice there are thousands of great resources for Ubuntu scattered around on many topics. You will also find a ton of great people in Ubuntu community hanging out in the #ubuntu room on IRC on freenode.net or if you prefer to ask direct detailed questions check out http://askubuntu.com. I hope that this guide has helped you get up and running with Ubuntu, please comment below with any questions or comments or I can be found on twitter @fromanegg, thanks for reading!