I received a large number of questions after my last blog post, 100% pure css radial progress bar, about the attribute selector I used so I figured a quick followup post detailing the 7 (at the time of writing) available attribute selectors across CSS2 and CSS3.

Attribute Selector Syntax

[attributeName{selector}value]

Attribute Selectors

[user]
/* matches */
<div user></div>
<div user="foo"></div>

Any element which has a user attribute regardless of value.

[user=foo]
/* matches */
<div user="foo"></div>

Any element which has a user attribute with the exact value foo.

[user~=bar]
/* matches */
<div user="foo bar"></div>
<div user="bar"></div>

Any element which has a user attribute with the exact value bar or the value bar in a whitespace-separated list.

[user|=baz]
/* matches */
<div user="baz"></div>
<div user="baz-bar"></div>

Any element which has a user attribute with the exact value baz or a value starting with baz followed by a “-”.

[user^=foo]
/* matches */
<div user="fooBar"></div>

Any element which has a user attribute with a value that starts with foo.

[user$=bar]
/* matches */
<div user="foobar"></div>

Any element which has a user attribute with a value that ends with bar.

[user*=baz]
/* matches */
<div user="foobazbar"></div>

Any element which has a user attribute with a value that has baz anywhere in it.

If you don’t have to support IE 6 you’re in luck because you should have full support for all of these all the way back to IE 7. As usual feel free to let me know your thoughts below or mention me on twitter @fromanegg - Happy selecting!

Building any kind of progress bar in pure css is kind of a misnomer because after all it is a representation of some external event, and as such needs to be told what stage to represent. No matter, this is how I went about creating a radial progress bar (or circular progress bar if you prefer) in pure css3 - in a follow-up post I’ll show you how to use javascript to influence the value.

Click here to view an example of the pure css radial progress bar.

This will only work on modern browsers which support css3 animations and transforms. If you would like to support older browsers there are plenty of javascript heavy options available. I’m also only including the -webkit prefixed rules for brevity but, using the appropriate prefixes (or lack thereof), this will also work in Internet Explorer 10+, FireFox 5+, Opera 12+.

Beyond the typical css properties that you should be familiar with I’ll also be using:

The markup is very light with only a wrapper and two divs which represent the progress. You’ll notice that I’m using data-attributes instead of using classes for the animation selectors. I do this because I feel that animations are more representative of a process than styling.

<div class="wrapper" data-anim="base wrapper">
  <div class="circle" data-anim="base left"></div>
  <div class="circle" data-anim="base right"></div>
</div>

First our basic styles.

.wrapper {
  width: 100px; /* Set the size of the progress bar */
  height: 100px;
  position: absolute; /* Enable clipping */
  clip: rect(0px, 100px, 100px, 50px); /* Hide half of the progress bar */
}
/* Set the sizes of the elements that make up the progress bar */
.circle {
  width: 80px;
  height: 80px;
  border: 10px solid green;
  border-radius: 50px;
  position: absolute;
  clip: rect(0px, 50px, 100px, 0px);
}

Then onto the animation rules.

/* Using the data attributes for the animation selectors. */
/* Base settings for all animated elements */
div[data-anim~=base] {
  -webkit-animation-iteration-count: 1;  /* Only run once */
  -webkit-animation-fill-mode: forwards; /* Hold the last keyframe */
  -webkit-animation-timing-function:linear; /* Linear animation */
}

.wrapper[data-anim~=wrapper] {
  -webkit-animation-duration: 0.01s; /* Complete keyframes asap */
  -webkit-animation-delay: 3s; /* Wait half of the animation */
  -webkit-animation-name: close-wrapper; /* Keyframes name */
}

.circle[data-anim~=left] {
  -webkit-animation-duration: 6s; /* Full animation time */
  -webkit-animation-name: left-spin;
}

.circle[data-anim~=right] {
  -webkit-animation-duration: 3s; /* Half animation time */
  -webkit-animation-name: right-spin;
}

And finally, the keyframes.

/* Rotate the right side of the progress bar from 0 to 180 degrees */
@-webkit-keyframes right-spin {
  from {
    -webkit-transform: rotate(0deg);
  }
  to {
    -webkit-transform: rotate(180deg);
  }
}
/* Rotate the left side of the progress bar from 0 to 360 degrees */
@-webkit-keyframes left-spin {
  from {
    -webkit-transform: rotate(0deg);
  }
  to {
    -webkit-transform: rotate(360deg);
  }
}
/* Set the wrapper clip to auto, effectively removing the clip */
@-webkit-keyframes close-wrapper {
  to {
    clip: rect(auto, auto, auto, auto);
  }
}

This works by creating two elements with circular borders and then hiding half of each element and storing those underneath the clip of the wrapper div. I animate a css transform to rotate both elements at the same rate until the 50% mark, at which point the first element stops, the wrapper clip is removed, and the second element keeps going to display the remaining 50%. Without javascript and some outside event influencing the display values this is probably more of a pure css loading indicator so in a follow-up post I’ll show you how to use javascript to influence the value of progress bar.

Click here to view an example of the pure css circular progress bar

I haven’t seen this approach used elsewhere yet so if you come across any other pure css radial progress bars or if you end up using this technique I’d very much appreciate if you would let me know so I can check them out. Any questions please comment below or mention me @fromanegg. Thanks for reading!

Javascript being prototypal means that it can access methods and properties through what is known as the prototype chain. Everything in Javascript is an object, and every object has a special property known as the ‘prototype’. This post is a continuation of my previous post Constructor chaining & inheritance in javascript. I recommend that you read that post first as I’ll be referencing some of the same code.

The prototype is defined as an “object that provides shared properties for other objects” - Ecma International. What this means is that, by default, any object that inherits from another object automatically has reference to the parents prototypes all the way through the inheritance tree. When you call a method on an object (remember everything in Javascript is an object) it first looks through the local prototype, if it’s not found, it then continues checking prototypes up until it hits Object.prototype to find that method before throwing an error. To illustrate that lets slightly modify our mustang instance and take a look at the instance in the inspector.

function Car() {
    this.color = "red";
}

Car.prototype.getColor = function() {
   return this.color;
};

var mustang = new Car();
console.log(mustang.getColor()); // Prints `red` to the console
console.log(mustang.toString()); // Prints [object Object] to the console

Stepping through this code you’ll see that we create a new constructor function as we did previously but this time we are creating a new getColor method on Car’s prototype that returns the color of the instance of Car. We then create a new instance of Car and log the output of the getColor method to the console. The following line is a perfect example of walking the prototype chain to try and find a toString method. We clearly didn’t create this method so where is it coming from? This is best illustrated using a screenshot of the browser console log of our mustang instance.

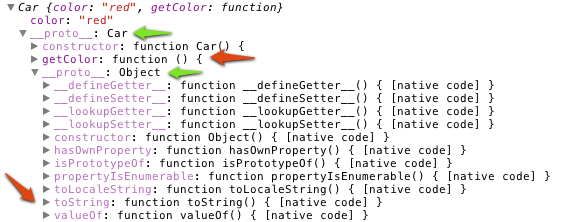
First thing to notice is that we don’t actually have a prototype property here but __proto__ which is a non-standard label for accessing the prototype of an object. In the prototype of our Car instance we have the getColor method that we created which matches with the above code block. Next, because Car is a function which extends Object, we have the Object prototype which includes, among other things, the toString method that we used.

It is considered bad practice to overwrite the native method prototypes because other code on the page might be relying on those native prototypes to function properly. So what do you do if you want to use your own toString method? By creating a toString method in the prototype of your instance, Javascript will run into that one first and use it instead of the native method.

function Car() {
    this.color = "red";
}

Car.prototype.toString = function() {
   return this.color;
};

var mustang = new Car();
console.log(mustang.toString()); // Prints `red` to the console

So here we create a toString method on the Car prototype to return the color of Car. This time when we call the toString method, Javascript runs into our own toString method first and executes it instead of the native method printing red instead of [object Object]

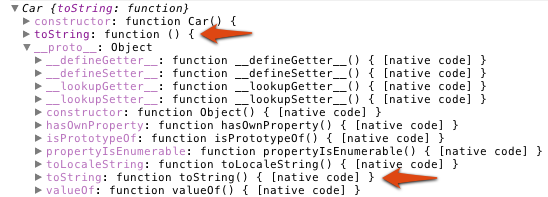
Taking a look at the console log of our mustang object, you can now see the two toString methods and where they are in the prototype chain. Note: Although the console shows __proto__ make sure you don’t access it directly because it’s not available on all platforms, always use prototype.

To do constructor chaining while maintaining the prototype chain requires you to take one more step. If you simply take the lessons from the previous post and this post so far you would assume you could write something like.

function Baddie() {
  this.level = 1;
}

Baddie.prototype.levelUp = function() {
  this.level++;
};

function Spider() {
  Baddie.apply(this);
}

var spider = new Spider();

spider.levelUp(); // Throws TypeError

By running the above script you will see that you get an error in the console “Uncaught TypeError: Object # has no method ‘levelUp’ ”. And that is because when you chain constructors in this method you aren’t maintaining reference to the parents prototype. To make this work as you would like you need to add one more line.

function Baddie() {
  this.level = 1;
}

Baddie.prototype.levelUp = function() {
  this.level++;
};

function Spider() {
  Baddie.apply(this);
}
Spider.prototype = new Baddie(); // Add this line

var spider = new Spider();

spider.levelUp();
console.log(spider.level); // Prints `2` to the console

By assigning the prototype of your new object to a new instance of your parent you maintain the prototype chain giving you access to its methods.

Combining the above lessons allows you to infinitely chain constructors as we did previously but this time, also maintain the prototypes.

function Baddie() {
  this.level = 1;
}

Baddie.prototype.levelUp = function() {
  this.level++;
};

function Spider() {
  Baddie.apply(this);
}
Spider.prototype = new Baddie();

Spider.prototype.boost = function() {
  this.level = this.level + 10;
};

function SuperSpider() {
  Spider.apply(this);
}
SuperSpider.prototype = new Spider();

var superSpider = new SuperSpider();

superSpider.levelUp();
console.log(superSpider.level); // Prints `2` to the console
superSpider.boost();
console.log(superSpider.level); // Prints `12` to the console

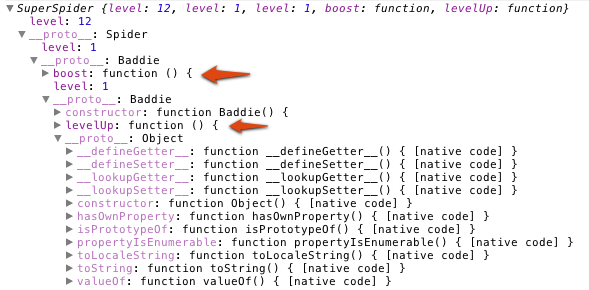
And for reference here is the console output of our superSpider class pointing out the levelUp and boost functions

I’m sure you’re thinking that this is pretty convoluted and you would be right. Next time I’ll be showing you an ES5 convenience method to clean this up, as well as some YUI OOP methods which greatly simplify this task as well as handle all of the edge cases. Thanks for reading and if you have any questions or comments you can comment below, or mention me @fromanegg. Till next time!

My talk from YUIConf 2012, where I showcase the issues of modern web development that arise when using various libraries and explain how the features of YUI make it a clear leader for development teams of any size. I discuss standard development procedures, modular development and extensibility, API consistency, documentation, and testing. Hope you enjoy, Let me know what you think!

Fueled by the constant push for new ideas and better experiences by our clients and employers; web development has to be one of, if not the, fastest evolving industry today. It’s our job as developers to at least keep up with the curve; unfortunately because of this constant push we often end up over specializing, leaving us ill prepared come the time to move onto the next big thing. We try to remedy this complacency by reading what others are working on and dabbling here and there on side projects, but quite often we can’t dedicate enough of our personal time to keep ahead of that curve.

Some employers, seeing this issue time and time again, have implemented dedicated personal project time in which you take a section of your typical work week to work on a project of your choosing that’s outside of the scope of your daily project. This forces you to break out of your typical mindset and keep innovating.These employers do this because they understand that projects don’t last forever and when those projects end they want you to be prepared for the next thing without having to lose a couple weeks or more getting back up to speed.

These personal projects also have other positive side effects for your employer. Not only will they have developers who don’t feel burnt out, but are also constantly innovating and trying new things which may turn into new products or product enhancements that they never otherwise would have had. A number of very popular products came out of these programs such as the public transit section of Google Maps.

But of course in the real world not all companies are able to offer this perk, so what can you do if your boss turns your personal project time request down?

You can start off by reading at least one blog post per day on something that interests you, try to also pick a couple every week which aren’t in your little corner of the web to get an understanding of the industry as a whole - who knows you may find something you really like that you otherwise wouldn’t have known about.

Participate in local dev meet ups - talking to other developers from other companies, on other projects, in other industries is very refreshing when you have just spent the last 4 months hammering on the same feature.

If you find you are getting burnt out on your current task there is no shame in asking your project lead if you can switch to something else to recharge for a couple days.

And last but certainly not least. Dream up your own after hours personal project that challenges you, makes you learn something new, and maybe even uses some of the cool new technologies thst you have been reading about in those blog posts. But most importantly - schedule time to work on it. We all lead very busy lives and without that schedule it will be pushed aside forever.

My goal is that you can take at least a couple ideas from this post to avoid the oh-so-common burn-out and to try and always be prepared for the next big thing. Thanks for reading, and as always let me know what you think below or mention me on Twitter @fromanegg.