Juju works great for software development involving simple environments and is amazing for complex environments. A recent question on Ask Ubuntu “Is Juju a suitable tool for development as well as deployment?” made me realize that we use Juju for development every day but there really isn’t much documentation on the subject.

For the rest of this post I’m going to assume that you are already familiar with the concept of Juju and what problems it solves on the deployment side of things. If you aren’t, I recommend reading an earlier post of mine “Juju - Explain it to me like I’m 5”.

One of the biggest problems when developing any kind of software is getting the dependencies up and running in a way which matches the production environment close enough to be sure that you aren’t going to run into “this environment only” bugs. Sure you can install mysql onto your local machine and run the database dump on that install, but you also have to make sure that you apply all of the same configuration, indexes, build flags, etc. as the production environment.

Even once you get it up and running you then need the ability to update it after modifications were made by someone else on the project all with high production parity, and without extraneous downtime.

To illustrate the benefits of using Juju for development I’m going to use a fictitious photo and video sharing website. A website like this would require multiple services, load balancer, web server, database, blob store, user authentication, photo processor, video processor.

Keeping in mind that a Juju Charm can be written using any programming language or DSL that can be executed on the host machine. This means it can use Puppet, Chef, Python, JavaScript, Docker, and pretty much anything else you would like to use. Juju provides distinct advantages for project development depending on the lifecycle of the project. For our photo video site let’s first assume that we’re just starting the project and then later on we’ll assume that the project is mature, released, and still under active development.

Just starting out

Typically when a project starts you’re only going to need a couple services, the database and your webserver. Let’s start our environment and install the database and webserver on our local machine.

juju bootstrap local
juju deploy apache2
juju deploy mongodb

Great, It’s 5 minutes in and we now have apache2 and mongodb running on our machine in separate LXC’s, we can now start developing our website and pointing it to these services.

Parallel to this, your teammate is working on the user authentication service, it’s going well and they want someone to help them test it in the application environment. So lets get that service that they have been working on.

mkdir -p ~/charms/trusty && cd ~/charms/trusty
git clone --depth 1 [email protected]:photovideo/authenticator
juju deploy --repository=. local:trusty/authenticator

For more information on deploying local charms see This Post on Ask Ubuntu.

A few minutes later and you have an identical copy to their user authenticator service, you can point your website to it and give it a try. A little later the authenticator service has been updated and you’d like to run it again.

cd ~/charms/trusty/authenticator
git pull
juju upgrade-charm --repository=.

This process repeats itself throughout each service and across each member of your team. Allowing each one to update their dependencies within minutes to identical representations of how it’ll be run in production.

Released project

Now that your project has been released, deployed using Juju, running in production, you’ve had a chance to take advantage of Juju’s deployment and scaling features but how does Juju help you develop now?

In some ways it’s even easier to deploy. In this case, I’m going to assume that your services are private and not stored in the Juju Charm Store. If they were in there you wouldn’t have to first clone the repositories.

mkdir -p ~/charms/trusty && cd ~/charms/trusty
git clone --depth 1 [email protected]:photovideo/mongodb
git clone --depth 1 [email protected]:photovideo/authenticator
…

juju-quickstart -e local photovideo.yaml

Taking advantage of Juju Quickstart and the Juju bundles functionality you can deploy your entire environment with identical services, configuration, and machine placements. This will open up the GUI which will allow you to modify the machine placement of any of those services and change configuration values before deploying to your machine. Once you hit commit, sit back and wait for it to deploy an identical environment to your production environment on your local machine.

Now you can work on the specific service you’re interested in within an identical environment to everyone on your team. And when a service gets updated by another member on your team it’s trivial to update.

cd ~/charms/trusty/authenticator
git pull
juju upgrade-charm --repository=.

I hope this gets you excited to use Juju for development as well as deployment. My team uses Juju for development this way and has for over a year. It allows us to be more productive because we don’t have to waste time installing and updating services the hard way.

I’ll be creating a follow-up to this post with real code examples and workflows for doing the actual development of these services, stay tuned! Thanks for reading, if you have any questions or comments file them below or you can hit me up on twitter @fromanegg.
Over my career I’ve written in a number of different programming languages, most of them dynamic. It’s been about 10 years since I last wrote a project from start to finish in a typed language, C++, but recently I’ve been working with Go. It’s safe to say I had become blissfully ignorant of the benefits and challenges of a typed language and in working with Go I found myself really enjoying the explicit declaration of types with regards to stability and code legibility.

In many JavaScript projects you’ll see something like this:

function dataFiller() {
  var myObject = {};
  // 5 lines later
  myObject.Foo = 'bar';
  // 10 lines later
  myObject.Baz = 'bax';
  // 5 lines later
  return myObject;
}

This essentially means that you must read through an entire functions execution, and sometimes an entire modules execution to see what the structure of that object will become.

Now lets compare that to Go:

type myObject struct{
  Foo string
  Baz string
}

func dataFiller() *myObject {
  var data = &myObject{}
  // 5 lines later
  data.Foo = "bar"
  // 10 lines later
  data.Baz = "bax"
  // 5 lines later
  return data
}

Here you don’t even have to read further than the function declaration to know what the function will return and then you simply have to reference that type in the file to know ahead of time what it’s structure will be.

Throughout my time as a developer I’ve noticed that it’s quite rare that you cannot predict with 100% certainty what the data structure of your variables will be but, in dynamic languages, we don’t ever seem to outline that structure for people reading and writing the code. So this got me thinking about how this workflow can be adopted in JavaScript to give us the benefits of types using the native language constructs without having to use a compile target like Typescript. In practice it turns out to be quite simple:

// Method to convert defined object literal 'type'
// into a 'locked down' data store.
function createObject(obj) {
  var stub = Object.create(null);
  var keys = Object.keys(obj).forEach(function(key) {    
    Object.defineProperty(stub, key, {
      configurable: true,
      enumerable: true,
      writable: true,
      value: obj[key]
    });
  });
  Object.seal(stub);
  return stub;
}

// Your 'type' which will be used to create
// usable data store instances.
var myObject = {
  Foo: '',
  Baz: ''
};

// Fills the object with data.
// @method dataFiller
// @return {myObject}
function dataFiller() {
  var data = createObject(myObject);
  // Set values like normal.
  data.Foo = 'bar';
  data.Baz = 'bax';
  return data;
}

var fullData = dataFiller();
fullData.Foo = "can Update"; // Updated
fullData.Qux = "Can't add new properties"; // Not added

Following this pattern will allow you to write JavaScript with predefined data type which helps tremendously in readability with minimal amount of additional work. This is just a basic example to show how the typed structure could be applied to JavaScript, the createObject() method could be expanded on to add getters and setters which could enforce the property types and you could even expand this idea to use Go like interfaces following a similar structure. I feel the trivial trade-off in additional lines of code is well worth the structure which is now being enforced. What do you think? Have you written a large JavaScript application before where predefined data structures helped? Let me know in the comments below or on twitter @fromanegg. Thanks for reading!

When using ‘use strict;’ in your scripts you’ll find that you are no longer allowed to overwrite native methods like FileReader() so how do you test that these methods are being called with the appropriate parameters? Lets start with a typical function call involving FileReader() and then modify it to make it easier to test.

function importFile(file) {
  var reader = new FileReader();
  reader.onload = function(e) {
    processData(e.target.result);
  };
  reader.readAsText(file);
}

Pre ‘use strict’; days you could simply stub out the global FileReader() but since that’s no longer an option we need to get a little creative with our code structure. First thing we’re going to do is create a FileReader instance generator function.

function importFile(file) {
  var reader = generateFileReader();
  reader.onload = function(e) {
    processData(e.target.result);
  };
  reader.readAsText(file);
}

function generateFileReader() {
  return new FileReader();
}

Then we’ll move the onload callback to a named function.

function importFile(file) {
  var reader = generateFileReader();
  reader.onload = _readerOnloadHandler;
  reader.readAsText(file);
}

function generateFileReader() {
  return new FileReader();
}

function _readerOnloadHandler(e) {
  processData(e.target.result);
}

Now you can test the importFile function and its parts by stubbing out the generateFileReader function to return a basic reader stub and not have to worry about the native method. In the following example I’m using two simple stubbing methods to generate stub functions and methods.

it('parses files', function() {
    // Set up the stubs.
    var processStub = stubMethod('processData');
    // The second parameter of the stubMethod is what generateFileReader
    // will return when it's called.
    var reader = stubMethod('generateFileReader', {
      onload: null,
      readAsText: stubFunction();
    });
    // Call the public method.
    importFile('/path/to/file');
    // Make assertions
    assert.equal(reader.calledOnce(), true);
    assert.equal(reader.readAsText.calledOnce(), true);
    assert.equal(reader.readAsText.lastArguments()[0], '/path/to/file');
    // Call the callback.
    reader.onload({ target: { result: 'file data' }});
    // Make assertions
    assert.equal(processStub.calledOnce(), true);
    assert.equal(processStub.lastArguments()[0], 'file data');
  });

Splitting up the code in this way makes unit testing possible because you are essentially wrapping the native function call in a function which are you are able to stub out. Happy testing!

It’s common when moving from one version of your application to another that you will want to maintain all of the SEO cred you have built up while simultaneously moving to a new url syntax. To do this people usually reach for mod_rewrite with apache or nginx for which there is quite a bit of documentation on this topic. Unfortunately the same can’t be said for rewriting and 301 redirecting when using HAProxy.

I have a rather common use case. I plan on moving this blog from Tumblr to Ghost using the Ghost Juju charm and the HAProxy charm to handle load balancing, reverse proxy and rewriting and redirecting the old Tumblr style urls to the Ghost url format.

Using mod_rewrite you would likely write something similar to the following to handle rewriting the url to the new syntax and redirecting with a 301 response code:

RewriteEngine On  
RewriteRule ^/post/\d+/(.+)/? http://example.com/$1  [R=301,L]

HAProxy however doesn’t have a single rule for rewrite and redirect instead we have to combine reqrep, to rewrite the url, and redirect, to handle the actual redirection.

Assume the following front and backend configurations:

frontend haproxy-0-80
    bind 0.0.0.0:80
    default_backend haproxy_service

backend haproxy_service
    balance leastconn
    cookie SRVNAME insert
    server ghost-0-2368 10.0.3.220:2368 maxconn 100 cookie S0 check

In order to rewrite the url we first need to add the rewrite into the frontend:

frontend haproxy-0-80
    bind 0.0.0.0:80
    default_backend haproxy_service
    reqrep ^([^\ :]*)\ /post/\d+/(.+)/?     \1\ /\2

This will rewrite the old Tumblr style url format to the new Ghost style url format and pass that url off to the Ghost webserver. If you’re ok with the user still seeing and using the old url style then you can stop here. Both the real Ghost url format and the old Tumblr style url format will work. If however you want to tell the users and any search engines that the old url is no longer valid and to use a new one instead we need to add the redirect rule:

frontend haproxy-0-80
    bind 0.0.0.0:80
    default_backend haproxy_service
    reqrep ^([^\ :]*)\ /post/\d+/(.+)/?     \1\ /\2
    redirect prefix / code 301

The HAProxy redirect syntax requires us to specify what kind of redirect we want to occur. The options are ‘location’, ‘prefix’, and ‘scheme’ none of these truly fit redirecting an old to new url. Fortunately we can trick HAProxy into doing just what we want by telling it we want to redirect to change the prefix of the url and passing / as the url to prefix along with the code we want to send, 301.

We aren’t quite done. If we leave this as is it will redirect every rule, including the Ghost url formatted ones which will put it into a redirect loop. In order to fix this we need to create an access control list to only redirect the old urls:

frontend haproxy-0-80
    bind 0.0.0.0:80
    default_backend haproxy_service
    acl old_url path_beg /post
    reqrep ^([^\ :]*)\ /post/\d+/(.+)/?     \1\ /\2
    redirect prefix / code 301 if old_url

To the frontend we added a new acl rule called “old_url” which returns true if the path begins with /post. We then add the conditional ‘if old_url" to the redirect rule and we’re done. After restarting the HAProxy service you’ll be able to use the old url structure and be 301 redirected to the new Ghost syntax urls which also remain functional.

In trying to resolve this issue I spent many hours reading the HAProxy documentation, reading blog posts and testing. I Even created a serverfault question which I have now updated with the solution so I hope that this post will save others a bunch of time. As always if you have any questions or comments please comment below or mention me on Twitter @fromanegg.

Juju is brilliant. Ok I am a little biased being that I work at Canonical on the Juju project, but every week I’m more and more impressed with how awesome Juju is and how easy it makes developing software and working in the cloud. I tweet and post a bunch about Juju but today I was asked to explain what Juju is to someone like they are 5.

Juju is often described as apt-get for the cloud, but what does someone who isn’t familiar with the Ubuntu ecosystem know about apt-get? I think I’ll need to go even more abstract…

Let’s say that you had built the most awesome Lego race car body (kids still play with Lego right?) but you didn’t know how to make the wheels or make it move with one of those Mindstorm engines. So now you have to go and play around for a long time to learn how to make a wheel and how to hook up engines. But this is going to take a long time and your mom is going to call you for supper soon, there has to be someone who is an expert wheel maker and Mindstorm engine builder right? Wouldn’t it be awesome if they could build wheels and engines you could use in your race car so you can finish it before supper?

Well that is what Juju does. It allows people who have expertise in a specific field to build packages that you can connect to your own projects without needing to be an expert in that field. So how does this help you write software faster in the cloud? Well I think that’s best explained with another, more grown up, example.

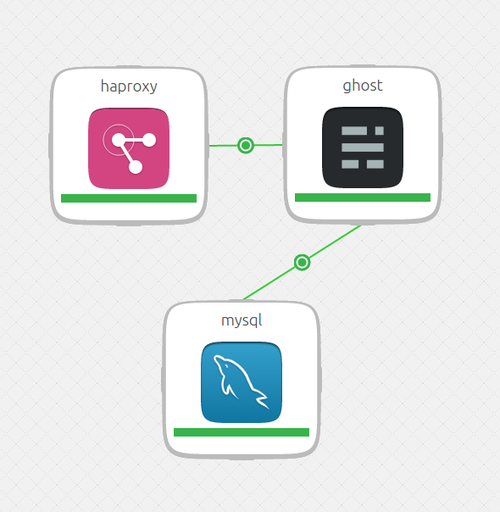
Recently, I wrote a Juju Charm for the Ghost blogging platform so that I can move this blog off of Tumblr and onto something a little more customize-able. The problem? I needed a front end server which was capable of load balancing the webservers when the load picks up and I don’t have the time to learn all about the various options and the best way to install and configure them. So I went to what’s known as the Juju Charm Browser and picked the haproxy Charm and added it into my environment. With multiple web servers I could no longer rely on Ghost’s built in SQLite implementation so I needed to hook up to an external MySQL database. Back to the Charm Browser I went and grabbed the MySQL Charm.

So now I have a load-balanced horizontally scale-able Ghost blog (coming soon). You can have one too, it’s incredibly easy too. For you to get your very own horizontally scale-able load-balanced Ghost blog all you have to do is execute these commands:

juju deploy ghost
juju deploy haproxy
juju deploy mysql
juju add-relation ghost haproxy
juju add-relation ghost mysql

Lets pretend for a moment that haproxy isn’t cutting it any longer and you instead want to use apache2:

juju destroy-service haproxy
juju deploy apache2
juju add-relation ghost apache2

Maybe your blog is super popular and you need another 5 webservers:

juju add-unit ghost -n 5

That’s it. You have now taken advantage of many peoples domain expertise to develop a cloud environment for your own blog.

So what if you wanted to use MySQL or any of these other Charms for a different application? That’s the best part these charms are written using the best practices for the particular charm but have easy to interface with hooks. To enable the Ghost charm to communicate with the haproxy charm all I had to write was:

#!/usr/bin/node
var exec = require('child_process').exec;
var port, address;

function storePort(err, returnedPort) {
  port = returnedPort;
  exec('unit-get --format=json private-address', storeAddress);
}

function storeAddress(err, returnedAddress) {
  address = returnedAddress
  exec('relation-set port=' + port + ' hostname=' + address);
}

exec('config-get --format=json port', storePort);

Juju charms can be written in anything that can be executed. The Ghost charm was written in JavaScript, the MySQL one in bash. Others use Python, Puppet, Chef, Ansible, even Docker containers can be orchestrated using a Juju Charm.

Want to run your own wiki:

juju deploy mediawiki
juju deploy mysql
juju deploy haproxy
juju add-relation mediawiki mysql
juju add-relation mediawiki haproxy

How about a MongoDB cluster, Hadoop cluster, Django app, a video transcoding cluster, and more including your own applications. All easily deployable and scalable across public clouds like EC2, HP Cloud, Joyent, Your private OpenStack cloud, and even your very own local machine. That’s right, the above commands all work to deploy identical set ups to all of these targets and more.

This just scratched the surface of the power of Juju but I hope that this glimpse has made you interested enough to go do some exploring of your own. You can find the documentation to get started with Juju here. And as always if you have any questions or comments you can comment below, find me on Twitter @fromanegg on G+ +Jeff Pihach or hop into #juju on irc.freenode.net and ask away.