Last week we released a new version of the Juju GUI which brings with it one major UI change plus a huge refactoring of the application state system.

If you have any questions about Juju or the Juju GUI, you can read the official documentation for Juju and join us on freenode.net in #juju and #juju-gui

Since Facebook released Flux there has been a lot of chatter about the unidirectional data flow architecture and how it helps large scale applications be easier to reason about and develop. With the Juju GUI nearing 70,000 lines of code in the core application we were running into an issue where it was becoming difficult to maintain the correct state throughout the many rendered UI components which are being consistently changed from the user interactions and changes coming in over the websocket from the users Juju environment.

In an effort to remedy this we determined that the only way to solve our current issues and prevent new ones going forward is to develop a unidirectional data flow architecture vs our MVC event style system which was currently in place. The execution flow we decided on was as follows:

  1. When a user visits a url or a delta comes in over the websocket it is parsed and split into disparate sections of state for each component that’s involved.
  2. That state is then saved into the state system.
  3. When the state system changes it diffs from it’s previous state and passes the diff off to the dispatcher.
  4. The dispatcher scans through the diff and passes off the various state components to their registered handlers.
  5. Those handlers then pass the updated data into the UI components.
  6. The UI components are then responsible for updating their DOM representation.
  7. If the user makes a change to the UI, that UI component requests a change from the state system and the cycle repeats. You’ll notice that this is strikingly similar to the Flux architecture:

It’s great to see cases of the multiple discovery hypothesis in action. It’s a sign that you’re on the right track for solving the bigger picture problems. It’s also nice to see someone formalizing this architecture for client side applications in the hopes that others will be able to skip these scalability problems. While our implementation differs from Flux, the architecture is nearly identical. I highly recommend this architecture to anyone writing a large complex application of any kind, client or server side, as it dramatically reduces the complexity of the applications execution.

Do you work on a large application? Do you think this architecture could help simplify your app? Let me know in the comments below, @fromanegg, or +Jeff Pihach Thanks for reading!

Anyone who is familiar with package versioning has used, or at the very least heard of, Semantic Versioning. For the uninitiated, semver is a three part version number in the format MAJOR.MINOR.PATCH ex) 1.13.2, and you can find very in-depth details on the semver website.

The semver website outlines the rules for incrementing version numbers as:

Your API typically returns a key/value pair for a requested field:

{ foo: bar }

But now you decide to change the value returned by capitalizing the first character in the returned strings:

{ foo: Bar }

What portion of the version should be updated with this change?

Jeff’s semver incrementing version number rules:

I inverted the rule set so it can be read that any later rule overwrites the previous rule so the version section moves up a level.

What do you think of this approach? Do you find it any easier to understand? Do you have any other rules to add? Or are you already using semver and have a different approach to deciding when to increase which number? Comment below or mention me on twitter @fromanegg and let me know. Thanks for reading!

The official release date of Ubuntu 14.04 LTS Trusty Tahr is coming up in just over a week from the time of writing. With that, many of you are going to want to install the next version of the best Linux operating system on your computers, and if you want to install on metal along side OSX and have a Apple Mac or Macbook this is the guide for you!

You’re going to need a few things before we get started:

Obligatory Warning

All of this information is provided without warranty of any kind. Always make and keep proper backups of your data.

Step 1

BACKUP YOUR COMPUTER

While it’s unlikely that an issue will occur which wipes the data on your disk it’s always highly advisable to have a couple quality backups just in case.

Go make another backup…I’ll wait.

DID YOU BACK UP YOUR DATA YET?

Step 2

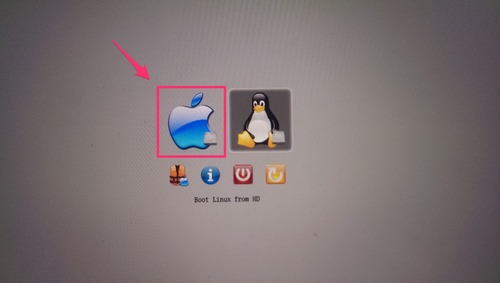
Now that you have a quality backup safely tucked away you will need to install rEFInd. Open the terminal and navigate to the location that you extracted the zip file and then follow the installation instructions for OSX. Once completed, restart your computer to confirm that rEFInd was installed correctly. On rebooting, the rEFInd boot loader should load up and you should select the Apple logo to get back into OSX. (sorry for the sub par photos)

Step 3

Now that you’re back in OSX we need to take that iso of Ubuntu 14.04 that you downloaded and make a bootable USB stick. Follow the 10 steps outlined here to create the bootable stick. You’ll know when it’s ready because OSX will pop open a dialogue saying that it cannot read the device.

Step 4

You need a place to put Ubuntu on your computer, so you’ll need to create a partition on your hard drive. The size of this partition will depend on the size of your disk and what you plan to do in Ubuntu, but it should be at least 10GB to give you some wiggle room (mine is 100GB). To do so you will use the OSX tool ‘Disk Utility’. There are some dated, but still accurate instructions on creating this partition here.

Step 5

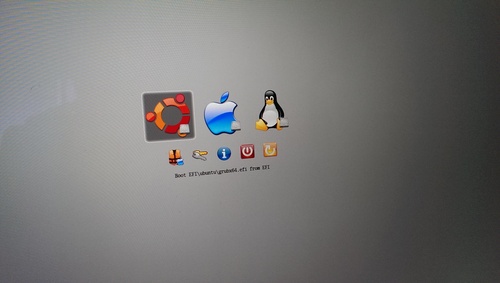
With the partition made it’s now time to stick the USB stick into your computer and reboot. After rebooting you should land on the rEFInd boot loader again with a few more options than before. If you do not see these options then reboot again holding the “option” key.

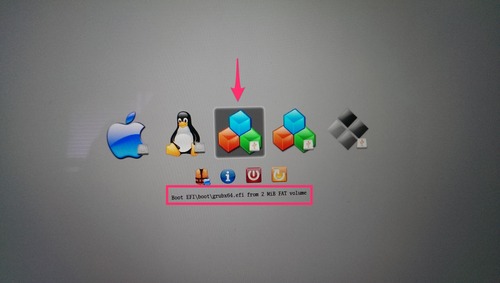
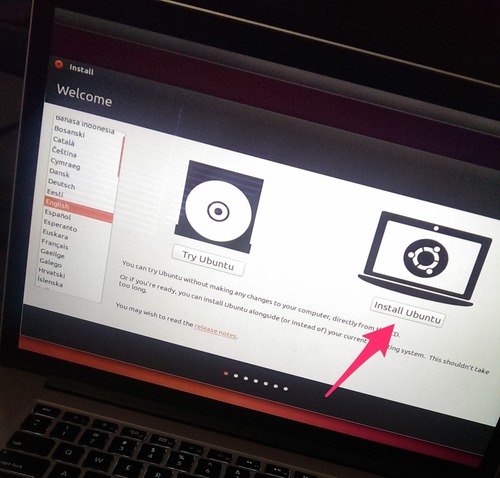
Your options may look a little different but you want to pick one of the options which are provided from the USB stick (There are three provided in this image). For the Haswell equipped machines you want to pick the option which reads something along the lines of “Boot EFI\boot\grubx64.efi …” and hit enter. This will start another boot loader with the first option “Install Ubuntu”, hit enter to select this option. After a little while you should be in the Ubuntu installer, follow through the steps until the installer asks you where you would like to install Ubuntu.

Note: If after progressing through the install process and you find that it boots into a black screen start again from Step 5 but choose an installer without “EFI” in the path name.

Step 6

Note: partitioning will be a little different for everyone so if you get confused hop onto IRC in #ubuntu on freenode.net or create a question on http://askubuntu.com for some help.

When you step through the installer you will get to a pane which asks you where you want to install Ubuntu to. The options should be pretty self explanatory. But if there isn’t an option to install Ubuntu into your new partition you will need to take the manual route. Select the manual partition option and you should be shown a screen which looks like:

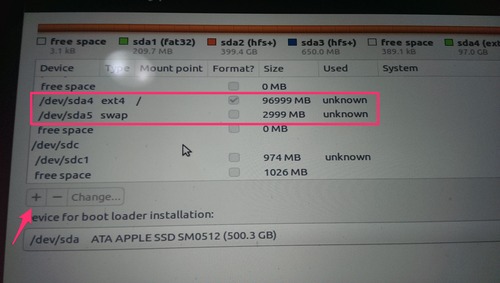
As you can see form this list, I created a 100GB partition originally and then created a 3GB swap partition. To take the partition you created in OSX and create a swap from it you will need to select it then hit the “Change” button and downsize it 3GB. This will leave you with “free space” of 3GB. Click the “+” button and create a new partition of the type “swap”. You’ll want to make sure your primary partition is of type “ext4” and that the mount point is “/”.

Continue on from here installing Ubuntu to your new partition.

Step 7

After the installation has completed remove the USB stick from your computer and reboot. Now when rEFInd shows up you should have an extra option with the Ubuntu logo. Click it and boot into Ubuntu.

Step 8

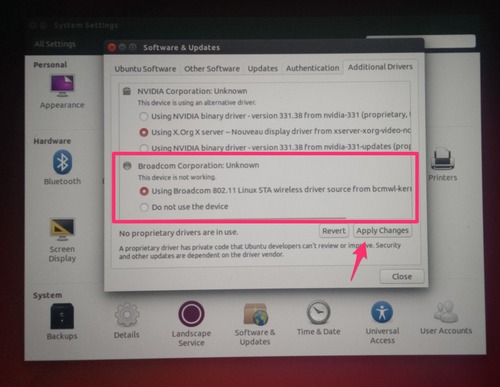
Once you have logged into Ubuntu, click the ‘System Settings’ icon in the launcher bar on the left. Select ‘Software and Updates’ and then select the ‘Additional Drivers’ tab. After this tab loads you should see a proprietary driver for the Broadcom wireless, select it and click ‘Apply’. Reboot the computer and you should now be able to click the network icon in the top right of the desktop to connect to a wireless connection.

Congratulations you now have Ubuntu installed along side OSX!

If you run into any problems along the way or have any questions your first stop should be your search engine of choice there are thousands of great resources for Ubuntu scattered around on many topics. You will also find a ton of great people in Ubuntu community hanging out in the #ubuntu room on IRC on freenode.net or if you prefer to ask direct detailed questions check out http://askubuntu.com. I hope that this guide has helped you get up and running with Ubuntu, please comment below with any questions or comments or I can be found on twitter @fromanegg, thanks for reading!

Our industry moves so fast that just to stay on the curve, let alone ahead of it, you need to spend a considerable amount of time reading other peoples code. Whether that be in code reviews, gists, or open source projects, you can glean a lot of invaluable information about new technologies, protocols, and techniques.

As an industry as a whole we need to understand this and write all code, even that which at first is not meant for public consumption, as self-documenting code with comments which detail, to anyone reading it, the why the code is doing what it’s doing.

Self-documenting code is code which follows commonly accepted style conventions, and uses descriptive variable, and function names. As an example, self-documenting code turns this:

function gd(p1, p2) {
  return [p1.x - p2.x, p1.y - p2.y];
}

Into:

function getDifference(point1, point2) {
  var x = point1.x - point2.x;
  var y = point2.y - point2.y;
  return [x, y];
}

It’s much easier to understand what the second function is doing at a glance vs the first.

This function is so trivial many will stop here and continue on. But trivial scripts have a way of becoming more, whether they grow into a project of their own or are copy/pasted into much larger projects where their use may not be as clear.

Lets assume for a moment that this function was copy & pasted into a larger projects utility class. Wouldn’t it be nice if it would automatically be added to the API docs?

/**
  Calculate the difference between the x and y coords of two points.

  @method getDifference
  @param {Object} point1 The first point to compare.
  @param {Object} point2 The second point to compare.
  @return {Array} The difference between the two points in the format [x, y]
*/
function getDifference(point1, point2) {
  var x = point1.x - point2.x;
  var y = point2.y - point2.y;
  return [x, y];
}

This function can now be copy and pasted into any project without any ambiguity about it’s functionality and will automatically be included in the API documentation.

To illustrate the importance of inline comments even with self documenting code. Take the following method from the Juju GUI source.

The Juju GUI has just over 65,000 lines of javascript excluding dependencies and growing fast every day. With so many developers writing code this fast it would be very difficult to understand why things were done the way they were done without the additional 17,000 lines of api comment blocks and inline documentation.

exportYAML: function() {
  var result = this.db.exportDeployer();
  var exportData = jsyaml.dump(result);
  var exportBlob = new Blob([exportData],
             {type: 'text/plain;charset=utf-8'});
  saveAs(exportBlob, 'export.yaml');
},

Using only self-documenting code you would probably be able to figure out that this function extracts some data from a database, converts it into yaml, then saves the blob to disk. Unfortunately this would have taken you at least 4x longer to parse because it doesn’t have any comments. You would also be missing some very important information from a previous bug fix. Now here it is with it’s comments:

/**
  Export the YAML for this environment.

  @method exportYAML
*/
exportYAML: function() {
  var result = this.db.exportDeployer();
  var exportData = jsyaml.dump(result);
  // In order to support Safari 7 the type of this blob needs
  // to be text/plain instead of it's actual type of application/yaml.
  var exportBlob = new Blob([exportData],
      {type: 'text/plain;charset=utf-8'});
  saveAs(exportBlob, 'export.yaml');
},

Without even reading the code you now know what the purpose of this method is which will dramatically reduce time when debugging or adding more features. More importantly however, the why of some of the code is outlined for future-you or another developer who may end up here. Without the comment regarding Safari 7 they very likely could have changed the mime type to application/yaml and introduced a difficult to find bug.

Although these examples were simple I hope I have illustrated the importance of adding comments to your self-documenting code to aid not only future-you but also any other developer who may come by and learn from your work. Thanks for reading! What commenting techniques do you use? Comment below or mention me on twitter @fromanegg.